Showing posts with label sweets. Show all posts

Friday, October 19, 2012

Ninjago Birthday Party


Mr. Mann's 7th birthday was last month and he wanted a Ninjago theme (naturally) - I think everything came together nicely! Here's some pictures from the party!

 My favorite part of any party is the desserts! We kept things simple for this one as I didn't have a ton of time to prep. Here's what we made:
- Rice Krispie 'Funshi'
- Ninja Sugar Cookies
- Ninja Cupcakes
- HoHo Numb-chucks 


The main food was "Funshi Peanut Butter and Jelly "Rolls"
{super easy to make - just make your sandwich, cut into strips and roll up}

First Activity: "Ninja Names"
I found a print out on Pinterest and helped the kids match up the letters in their names to create their own ninja name. They then wrote them on streamers that we tied around their heads to form Ninja Headbands. 


Second Activity: A "Ninja Training" Course 
The kids loved this - and the adults ended up having some big laughs while watching the kids run through the course. 

First up - gotta get the group in order to explain the course. Can you tell I've worked with kids for awhile now?


 First Skill "Agility": The kids ran through 'ninja swords' (pool noodles) that the adults waved up and down. I think the adults might have enjoyed this more than the kids...

Second Skill: "Accuracy": Hubs stayed up late to make ninja stars which the kids used to knock over the tubes made of paper towel rolls. The rolls were covered with black streamers to make them more ninja-ey.

Third Skill: "Balance": The kids picked up marshmallows with chopsticks from one bowl and ran them across the yard to put in another.

Fourth, and final, skill: "Strength": The kids broke boards that I made out of Styrofoam. I cut the Styrofoam into rectangles and then painted them with brown acrylic paint. I wish I had gotten a better picture - they turned out really well and actually looked like wood.

Of course the best part of an activity like this is what happens when the kids start improvising. Enter like B who thought it would be better to carry the marshmallow in her mouth. Smart, very smart :)

Of course no birthday party is complete without a fabulous cake! Many thanks to Sandy at Dessert Works - she always makes such great cakes for us! 

oh and a mini-breakdown...happens every time ;)

At the end of the day we had balloons left over and the kids wanted to release them into the sky. I know it's not great for the environment :/ I feel kinda bad about that....


And finally, our traditional birthday family portrait (minus mom as she had already left)

Hope this helps inspire your next Ninjago birthday party! Thanks for stopping by! 
Pin It!

Monday, November 21, 2011

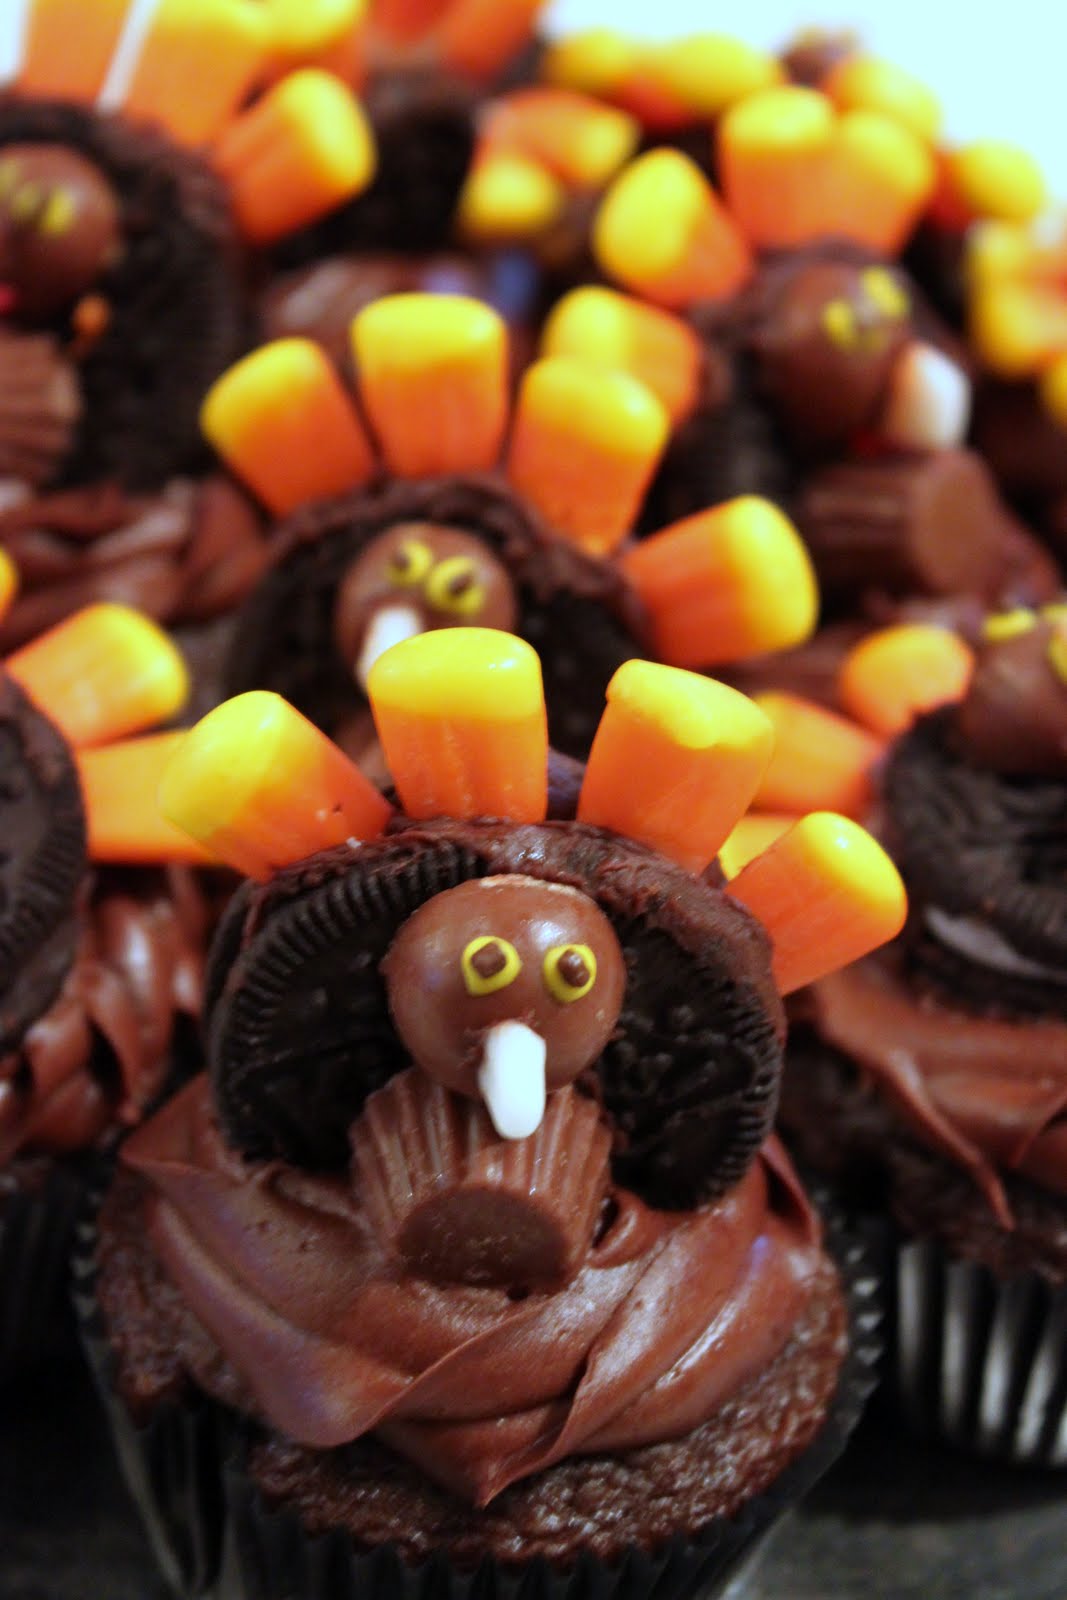
Oreo Turkey Cupcake Toppers

Short story time! 

Since I've known Hubs for almost 17 years, I've had the opportunity to get to know my in-laws very well. MIL {mother in law} is honestly one of the sweetest ladies I've ever met. She works really hard and is the ultimate homemaker. When we were home in college I would stay at his parents' house {I know, scandalous!} and she'd prepare three course meals and then whip up tons of baked goods, just because she felt like it. I remember so clearly turning to Hubs and saying 'who just feels like whipping up cakes and brownies in the morning? I hope you don't expect me to do that'. He laughed but I was dead-serious. I said, 'for real, don't expect me to take care of you like your mom. I'm not domesticated'.

Fast forward 5ish years on a Sunday morning when I whipped up these little guys. Why? 

Yep, you guessed it - just because I felt like it.

 Damnit!!!!


In all seriousness, I do love baking. I don't cook {though I've been doing more of that lately...} but I absolutely love baking, being challenged, holidays and making my little niece and nephew smile. So when I can combine all those things plus the new obsession with pinterest,  I'm one happy lady.

I stumbled upon this pin from Brown Eyed Baker {phenomenal baking blog!} via  Our Best Bites and I knew immediately that I had to jump on board and try it out. Here's the original pin from OBB:


While mine are definitely not as polished as the original I think they turned out cute and I think the nephew's class is going to love them.


OBB has a great tutorial but I'll give you the basics!

Ingredients/Supplies:

  • chocolate cake mix
  • chocolate buttercream icing
  • candy corn
  • oreos
  • peanutbutter cups {I used minis because I wasn't specific when I sent hubs to the store....}
  • chocolate sprinkles 
Bake your cupcake as normal and let them cool. While they're cooling start assembling your little turkeys. 
Let's assemble some turkeys!

1. Use some icing to act as glue and gently push the candy corn between the oreo cookies


2. Put some icing on the back of the peanutbutter cup and place on top of the oreo


3. Do the same with the whopper and place on the oreo
{I cut it in half before adhering it to the cookie so it was in proportion with the mini peanutbutter cup)


4. Cut the top white off the candy corn to use as the beak and adhere with dollop of icing


5. Use yellow icing to make dots for the sprinkles to sit in to make the eyes

6. Put a little dab of red icing to make the little gobbler-er thingy

annnnd here's what you should end up with!


I decided to use them as cupcake toppers so I iced up my cc's and smooshed the turkeys in there. I also did a couple with the turkeys laid on top of the cc's instead of standing them straight up. I like variety.


::::: These take a while! It took me almost an hour to assemble 12 turkeys! ::::

Some useful tips:
  1. Sit down! I moved to our passthrough so I could watch the game and it ended up being a lot easier to assemble them sitting down! 

  1. Don't touch! The icing needs to dry to hold them together so make them and leave 'em alone for a bit 
  2. Use a q-tip to clean up any messes on the details. The yellow eyes were the most challenging for me, I kept messing them up! It was helpful to have a q-tip on hand to wipe off the mistakes. Dip it in a little water to cleanly clear the yellow away, if needed.
  3. If your cookie breaks just put a little icing on there to 'glue' it back together 
  4. Use store-bought icing with a butter spreader {or whatever they're called} to spread the icing on the back of the whopper, peanutbutter cup and beak. Use the little icing tubes for the eyes and gobbler-er thingy. 
  5. Make an assembly line - I did 5 or so of each step and then moved to the next one {ie: put the 'feathers' on 5 oreos and then put the PB cups on each and then add the whoppers on all of them}
  6. HAVE FUN! Just a reminder ;)
They take a lot of time but they are just so darn cute that they're worth it! 


Pin It!

Sunday, April 10, 2011

Coffee-Hazelnut Cupcakes {Nutella}


Since I've been on this baking kick I've been trying to think outside the box {hehe} and make lots of different types of cupcakes. This one came from brainstorming with Hubs about some of his favorite flavors. 

Coffee - good
Hazelnut - good
Vanilla-hazelnut cupcakes with coffee-hazelnut icing - SO GOOD!

They were actually super-easy to make. I think Hubs could even make them without me. Maybe. Err, probably not. 

Vanilla-Hazelnut Cake:
  • 1 box funfetti cake {hubs' favorite}
  • 1 cup brewed strong coffee 
  • 3 Eggs
  • 3/4 cup oil
  • 1 tsp vanilla extract  
  • 1 tsp Nutella {hazelnut spread} per cupcake
  • 2-3 tsp heavy cream or milk

Coffee-Hazelnut Coffee Icing:
  • 2 cups confectioners sugar
  • 1/4 cup butter, softened
  • 3 tbsp strong brewed coffee {I used the same coffee that I brewed for the batter}
  • 1/2 cup-ish Nutella
  • 2-3 tsp heavy cream or milk

To Make the Batter:
1. Set oven to 350, place cupcake liners in pan and lightly spray with non-stick spray
2. Prepare the cake mix the way your instructed on the box {do not add the water}
3. Add the vanilla
4. Add the pre-brewed coffee 1 tsp at a time. Mix, taste, add until your happy with the flavor. Add the heavy cream/milk to thin the batter, as needed. 


5. Scoop the batter into your liners. I use a small ice cream scooper to keep things evenly proportioned 


6. Put about a tsp of Nutella on top of each cupcake and swirl together


7. Bake for about 18 minutes. Watch your oven closely, they're done when they spring back when you touch them or when a toothpick comes out clean. It's easy to over-bake cupcakes and nobody likes over-bakes cupcakes. I mean, I'll still eat them but.....

::::Naked Cuppies!!::::

To Make The Scrumptious Icing:

1. Cream the butter, sugar and vanilla together in your mixer
2. In a separate cup, mix the coffee and heavy cream together 
3. Add the coffee mixture a little at a time to thin the mixture and add the flavor 


4. Add the Nutella to thicken the icing and add the flavor. To be honest, I just added the Nutella until I was happy with the consistency. I'd start with a small amount and add until you are happy. I also added about 3/4 cup of a vanilla buttercream icing I had in the fridge. Why not? 

5. Mix, Mix, Mix until it's texture is how you like it!


So how does the icing go from the mixer to the pastry plastic bag? Well if you're like me, it's a very messy process! So here's what I've figured out to keep my kitchen halfway clean. 


1. Drop your icing tip in a large plastic bag
2. place the bag in a plastic cup
3. fill 'er up with icing
4. pull the bag out of the cup and twist. No mess!


and when you need to refill just repeat the process!

mmmm......

but I thought they looked a little plain and were missing something. Out comes the baking bin.....and on goes crushed up pecans. PERFECT!


Warning - these are very rich. And oh.so.delicious. I wish we wouldn't have eaten them all already....

Oh well, off to make chocolate-chip-cookie dough cupcakes. You know you want to check that out ;)
Pin It!

Sunday, April 3, 2011

Banana-Chocolate Cupcakes with Peanut Butter Icing


I've had an inkling to make banana cupcakes ever since my last batch of bananas went bad and found their way to the trash. Since I was out of town all last week I finally had the chance to whip these babies up. When hubs asked why I was making cupcakes at 9:00 on a Saturday morning I simply replied, 'cause I felt like it'. Ummmm....when did I become the chick that 'felt like' whipping anything up early in the morning??? I mean, for real, I used to sleep until noon. :::sigh:::

So all bright-eyed and bushy-tailed I ventured into modifying my devils food cake box into a choc-banana masterpiece. And the only thing that could top the cake is the yummy fantastic out of this world peanut butter icing. On the real - I might just scoop the icing off and eat it off all of the cupcakes. Maybe I already have....you'll neeeever know!

Chocolate Banana Cake:
  • 1 box devils food cake mix 
  • 1/3 cup oil 
  • 3 eggs
  • 1 tbsp vanilla extract
  • 3 ripe bananas, mashed
{did you notice that water is not on that list? No, I didn't mess up - the bananas will take it's place}

Heavenly Peanut Butter Icing
  • 1 stick of buttah (that's butter, not margarine - you can use it but it will be a little more oily)
  • 1 cup quality peanut butter (better quality = better taste)
  • 2 cups powder sugar
  • 1 tsp vanilla extract
  • 2 - 3 tbsp heavy cream or milk
To Make the Batter:

1. Prepare the cake mix as normal subbing the ingredients and amounts as listed above
2. Put the cake ingredients together in your mixer and mix it up!
Note, your batter will be a little thick - more like a brownie batter - this is ok! Remember, there's no water in there yet!
3. Meanwhile, mash your bananas with the back of a fork

4. Add the mashed bananas to the batter - this will thin it out and make it more like a regular cake batter 


5. Pour your batter into your cupcake liners. I use a small ice cream scoop to make sure they are all even
6. Place pans in 350 degree oven and bake for about 15 minutes - these bake quicker than normal so make sure to check them. Insert a toothpick to check for doneness, if it comes out clean then they are done. 
:::naked cupcakes:::

To Make the Icing:

1. Cream the butter and peanut butter together in your mixing bowl
2. Add the sugar and cream
3. Whip, whip, whip with your mixer. 

Once baked I thought that they needed a little extra umph so I piped some of the frosting down the center of the cupcakes. Moist? You betcha.
Then I thought it needed something else so I melted some chocolate icing and dipped the tops. It's kind of like a ganache but not as thick.

I then piped the PB icing on top and voila, heaven in a paper cup. 

Excuse me while I go eat my first second oh forget it, who's counting?? 
{maybe my jeans are....}


Pin It!
Related Posts Plugin for WordPress, Blogger...